
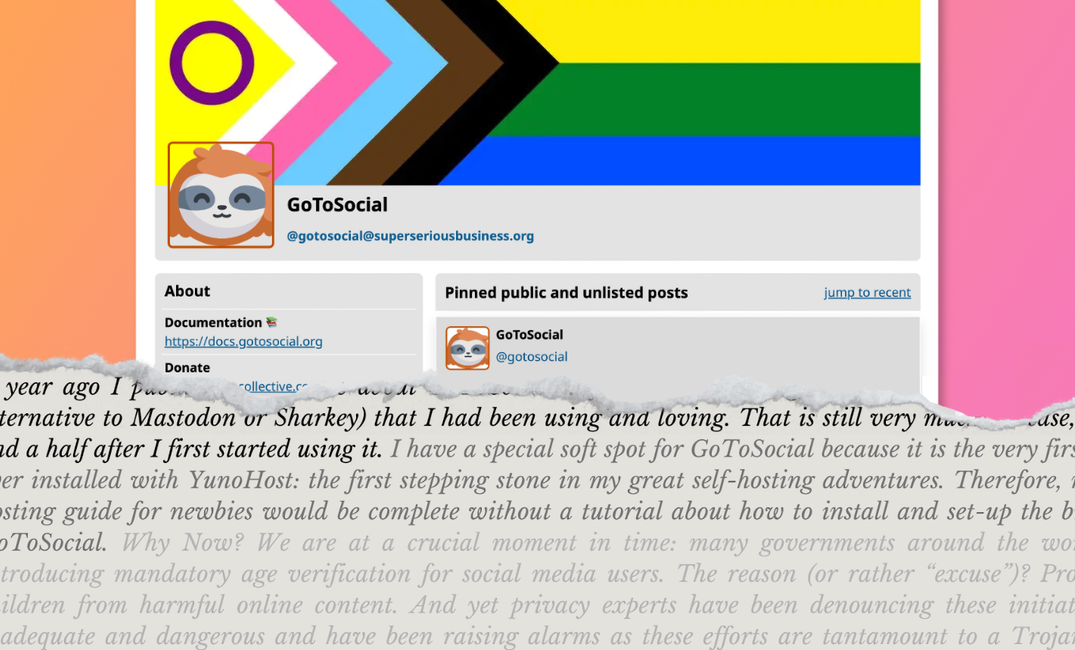
A year ago I published an article about GoToSocial, a fediverse microblogging software (think of it as an alternative to Mastodon or Sharkey) that I had been using and loving. That is still very much the case, a year and a half after I first started using it:
 Elena Rossini
I have a special soft spot for GoToSocial because it is the very first app I ever installed with YunoHost: the first stepping stone in my great self-hosting adventures. Therefore, no self-hosting guide for newbies would be complete without a tutorial about how to install and set-up the brilliant GoToSocial.
I initially thought I would cover everything in one post, but there is so much to discuss that I will break up the tutorial in different chapters, so that the information does not get too overwhelming. This first installment will discuss:
1) picking a domain name to use
2) associating the domain name to your YunoHost installation
3) installing GoToSocial
4) doing some essential tweaks to boost security
Why Now?
We are at a crucial moment in time: many governments around the world are introducing mandatory age verification for social media users. The reason (or rather “excuse”)? Protecting children from harmful online content. And yet privacy experts have been denouncing these initiatives as inadequate and dangerous and have been raising alarms as these efforts are tantamount to a Trojan horse bringing in the end of anonymity on the internet.

As an individual, I feel powerless opposing these forces. I am really concerned about the state of the fediverse - which does not have infrastructure in place to comply with these laws - and as an act of resistance and survival, I think it's more important than ever to teach how to self-host your own social media instance. I feel that self-hosted federated instances would fall outside the scope of mandatory age verification (if those things are ever introduced, European Union-wide).
Before We Begin
Before we begin, I highly recommend you read my article describing the unique features and advantages of the microblogging software GoToSocial:
 Elena Rossini
Are you ready to take the plunge? I will guide you through each step, so that hopefully the process will seem easy and straightforward - no coding experience necessary.
STEP 1: set up a domain name for your GoToSocial account
⏳ Estimated time: 10 minutes
Most people create a subdomain on their main domain called "social" to use with GoToSocial. This is practical, as you don't have to devote an entire URL to your federated profile.
Here is how you do it:
- Log into your YunoHost instance
- Click on "Administration" (link in the footer)
- Login again if necessary
- Click on "Domains"
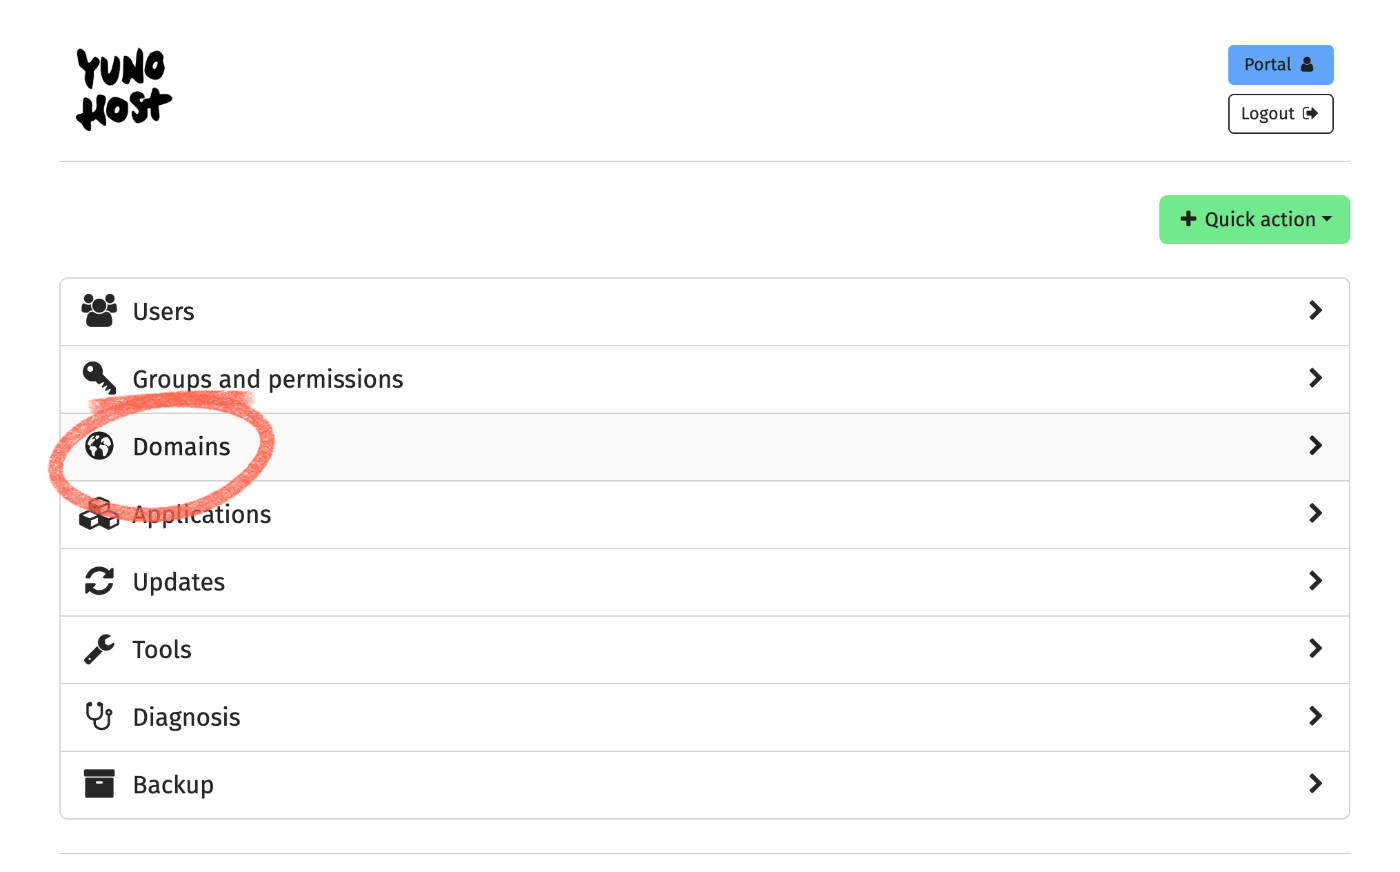
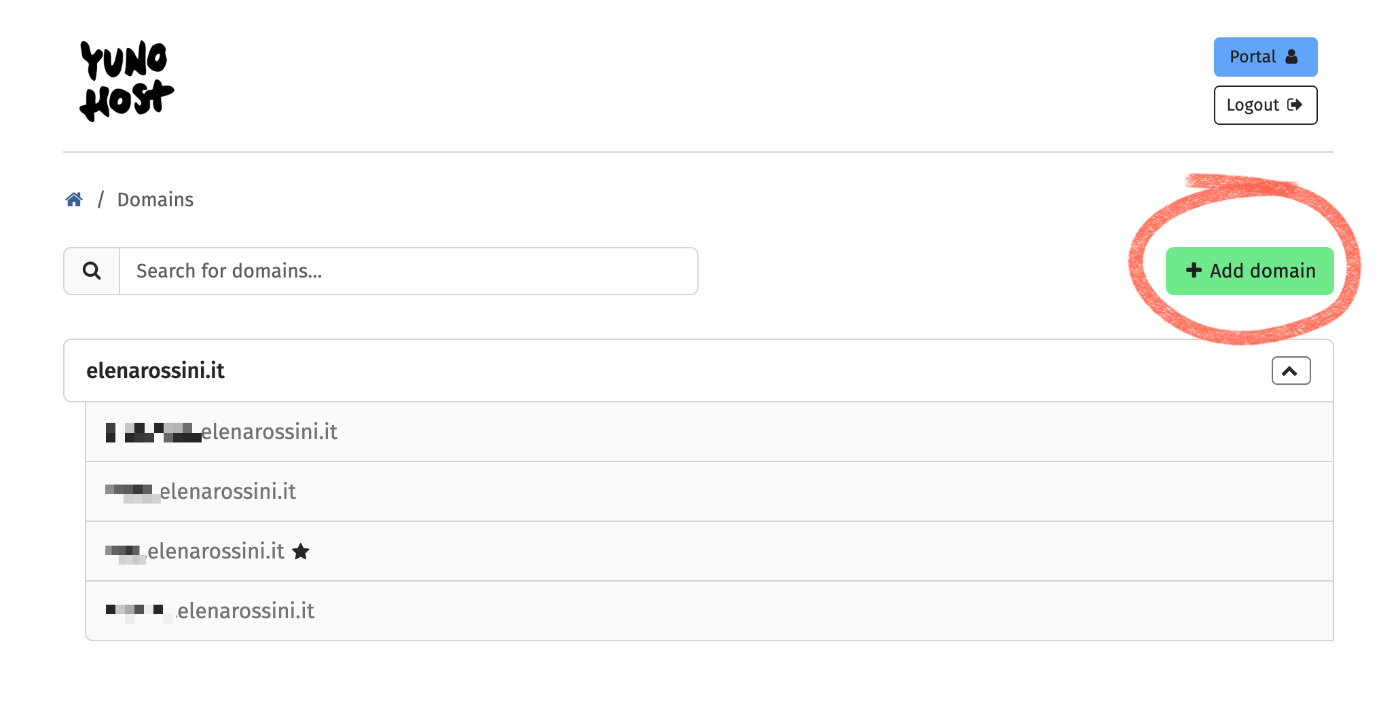
Once you're in "Domains" you should already have a main domain associated to your YunoHost instance; in my case it's elenarossini.it (for security purposes, I have pixelated the names of my existing subdomains). If you are happy using it for your GoToSocial account, you could simply click on the green button "Add Domain" in the top right corner:
From the new menu, you can see various options, like adding a domain or a subdomain. Click on "I want to add a subdomain of an already added domain." Then call the subdomain whatever you wish - popular options for this are "social" or "gts" - and make sure you click on "Also install Let's Encrypt certificate". Then press the green button "Add" at the bottom.
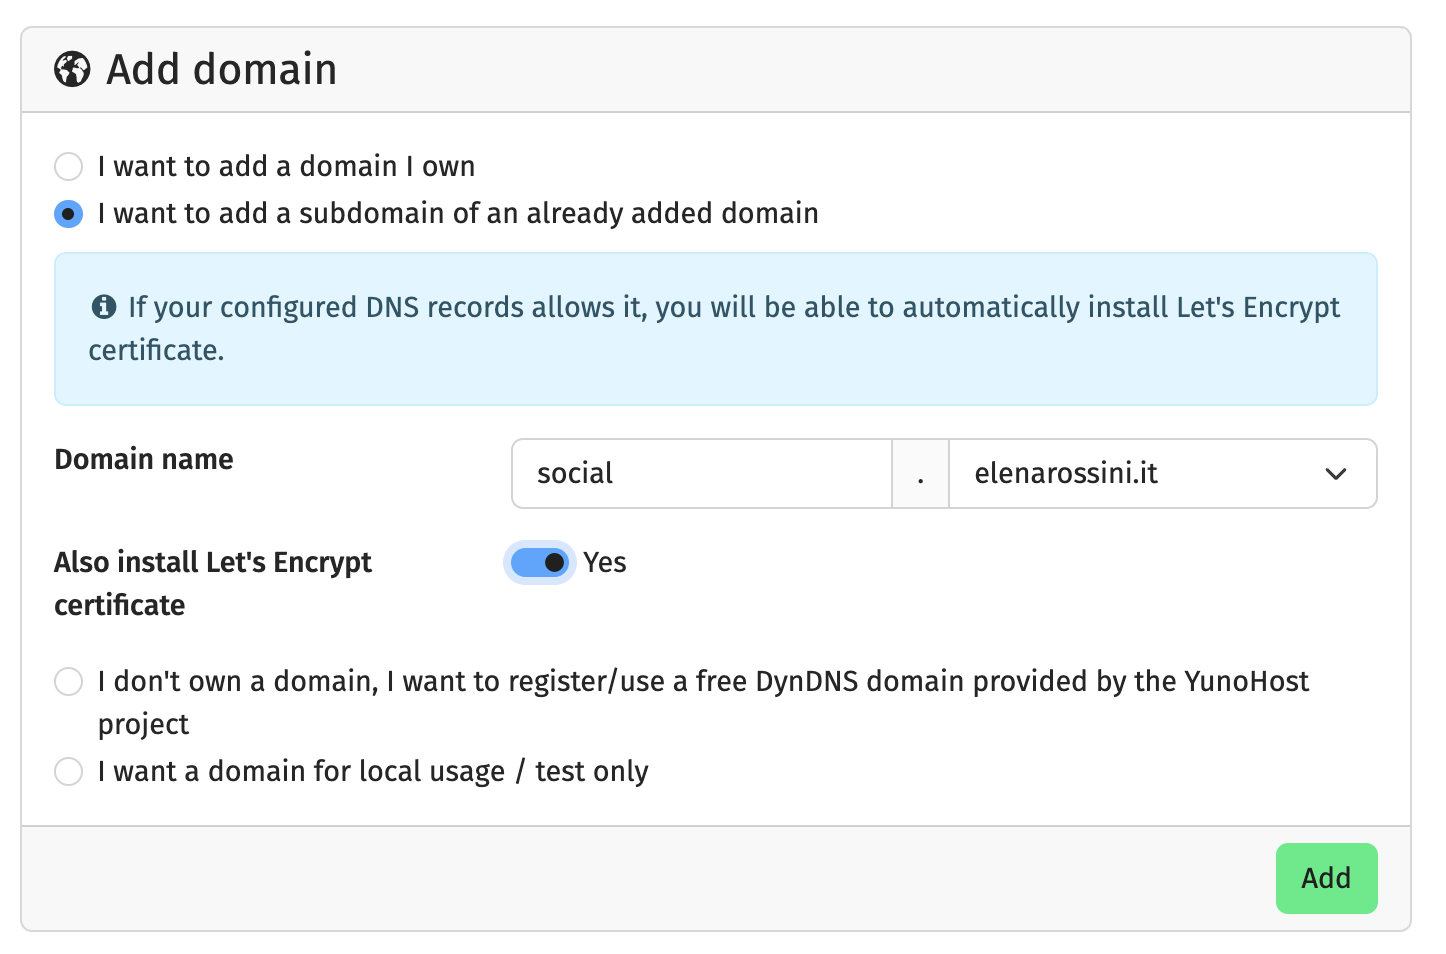
In less than a minute, YunoHost will create a subdomain for you and add it to your list of domains.
Once that happens, you will need to create a few DNS records for your new subdomain. Since you have already associated a domain name to your YunoHost account in a previous chapter of this series, you should be familiar with this process. As a reminder, you need to create:
- A
- AAAA
- TXT
- MX
- CAA
records for your brand new subdomain.
Thankfully, YunoHost makes it really easy for you, with crystal clear instructions about each one of them.
From your YunoHost dashboard go to "Domains" and then click on the subdomain you recently created for GoToSocial. Then click on DNS. You will see the instructions about the DNS records you will need to create for your subdomain:
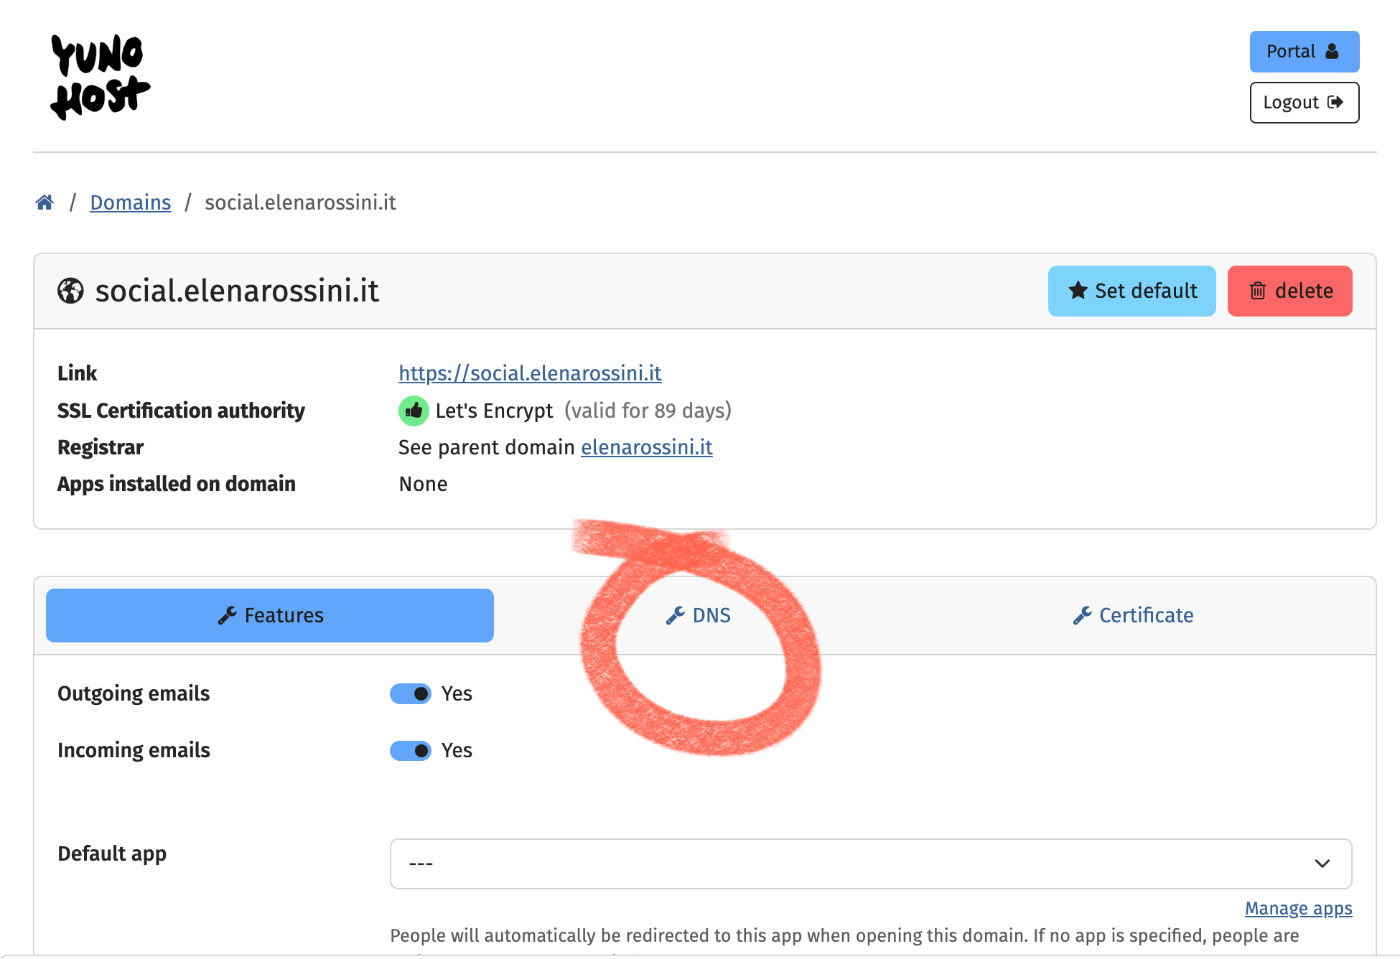
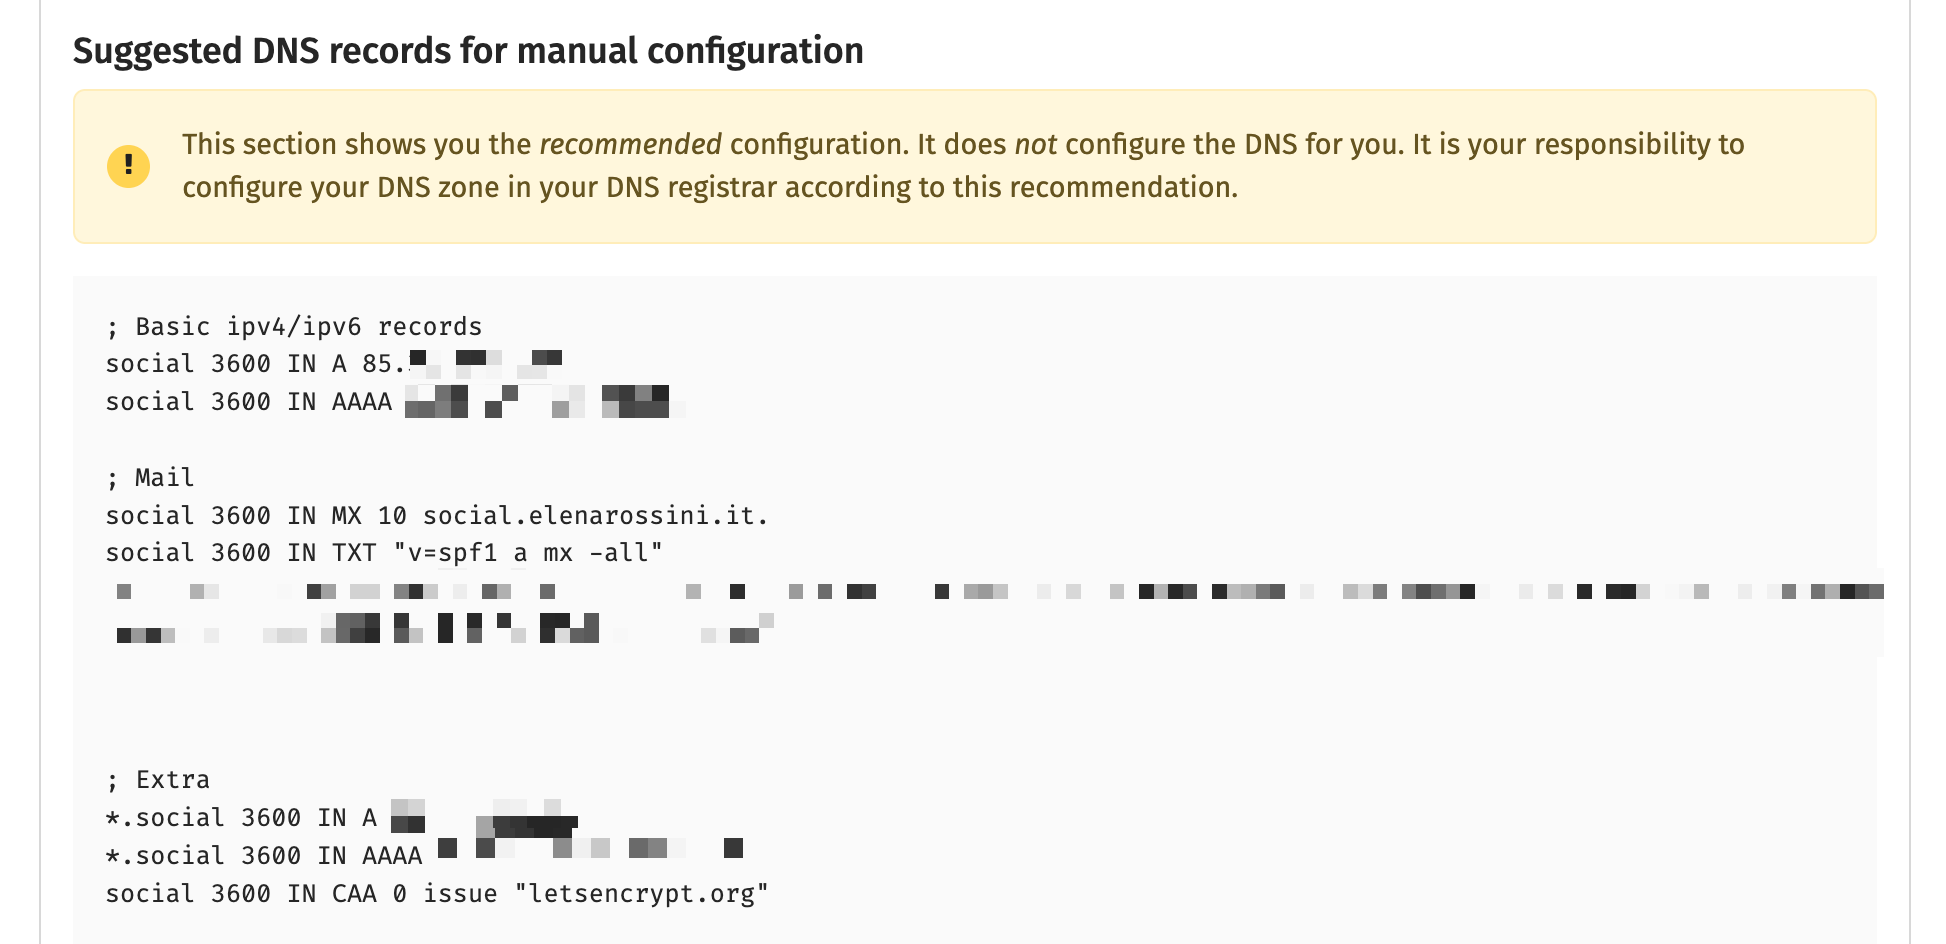
screenshots from the YunoHost Domains dashboard showing the "DNS" section and suggested records for A, AAAA, email and a Let's Encrypt certificate
Now head over to your domain name registrar to create these DNS records. In my case, it's Hostinger, but the process is pretty similar across registrars - you should have an option that says "manage DNS / Nameservers " or "Manage DNS records."
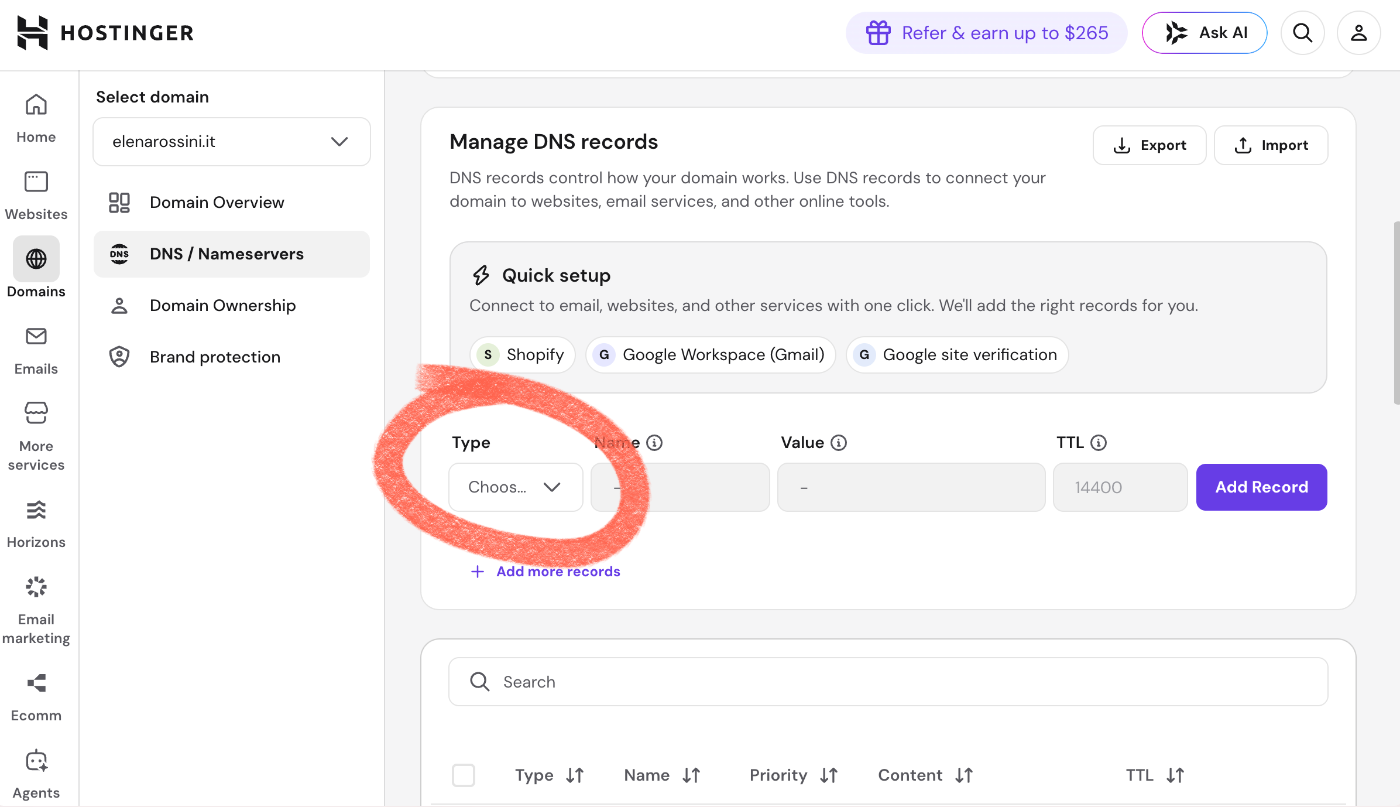
From there, select a record type and copy and paste the values that YunoHost recommended.
I will show you an example here - since a couple of readers in the past have reached out to me about difficulties following DNS instructions. Let's do the A record:
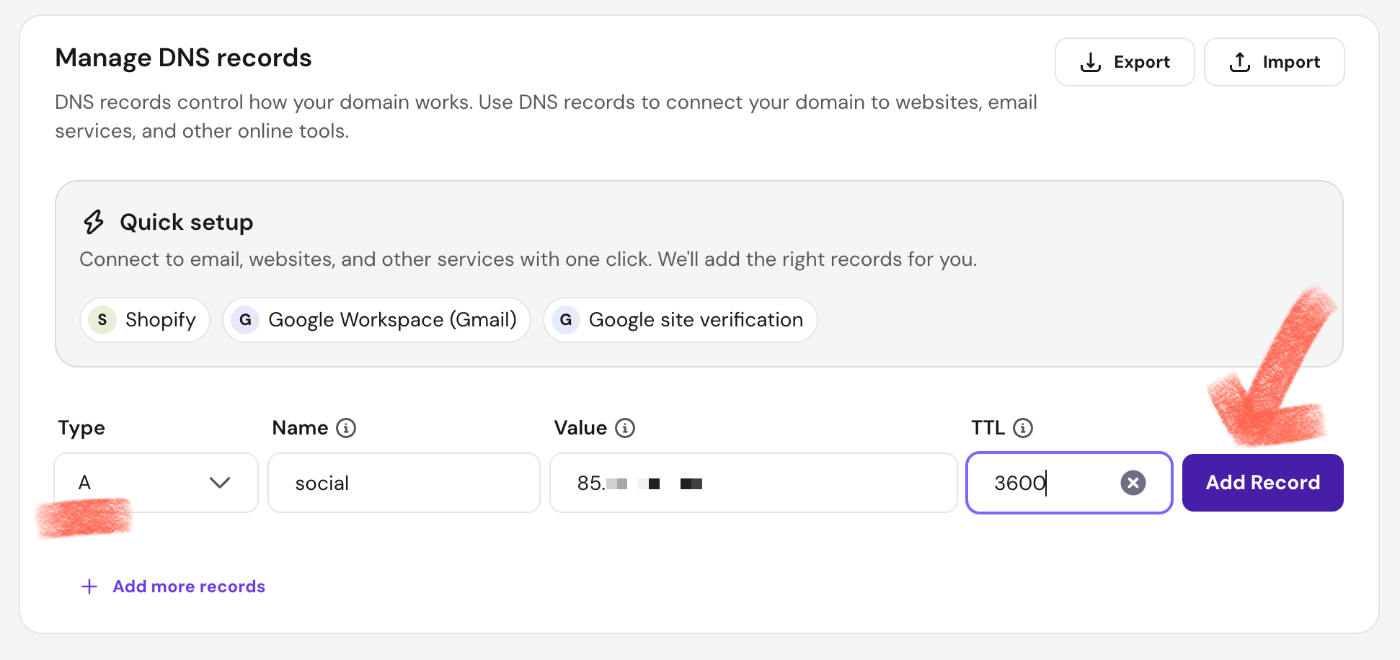
Then do the same things for the AAAA, the CAA and the mail records (TXT and MX).
The whole process should take about 5 minutes.
Once you have created all these records - CAA especially - go to the Domains page on your YunoHost instance and click on "Certificate" (the tab on the right of "DNS").
You should get a message that says "You're using a valid Let's Encrypt Certificate!" if not, check the button that says "ignore diagnostics check" and then press "Install Let's Encrypt Certificate."
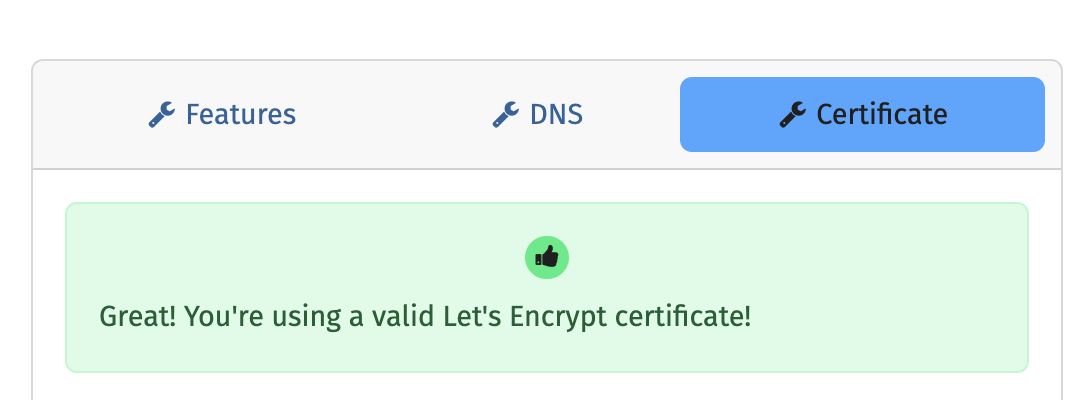
Good news! We are now ready to install GoToSocial!
Step 2: Let's install GoToSocial
⏳ Estimated time: 4 minutes
With boring - but necessary - DNS tasks out of the way, we are now ready to head over to YunoHost's amazing app catalog to search for GoToSocial.
From the administration dashboard click on Applications and then on the green button "Install an app":
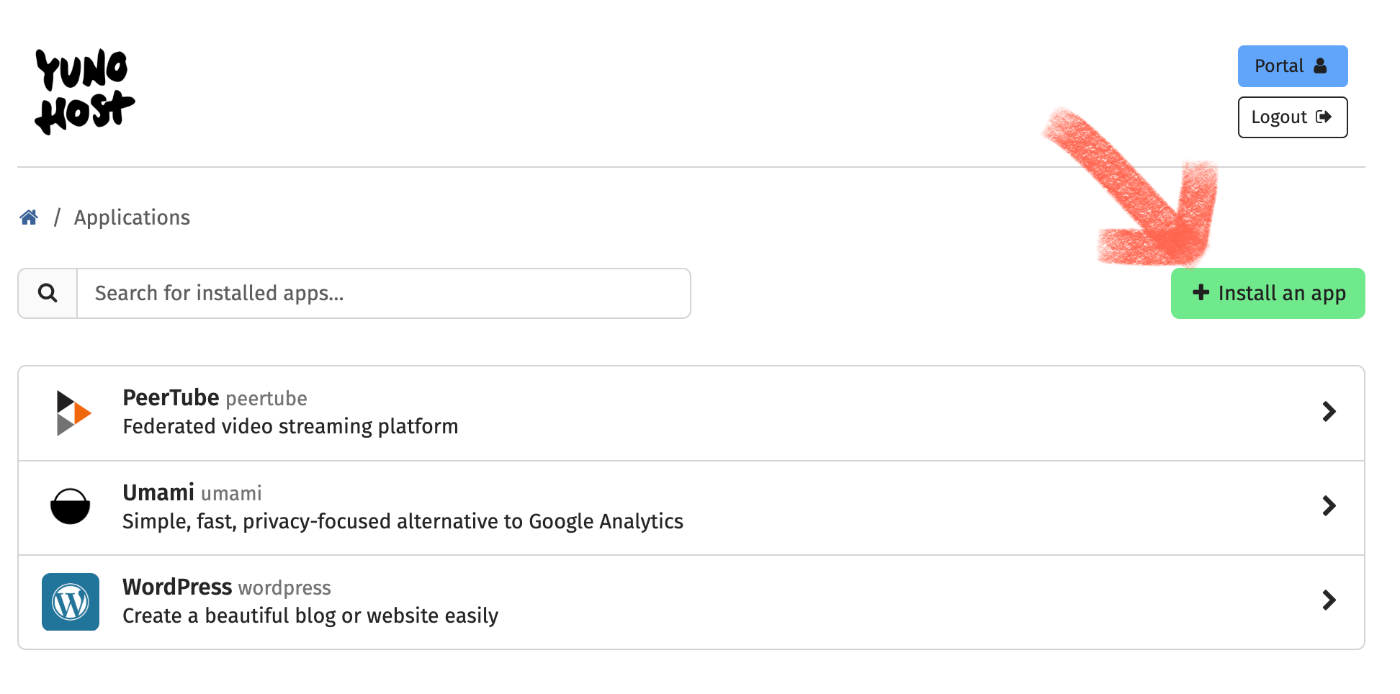
In the search bar, look for "GoToSocial" and then click on it:
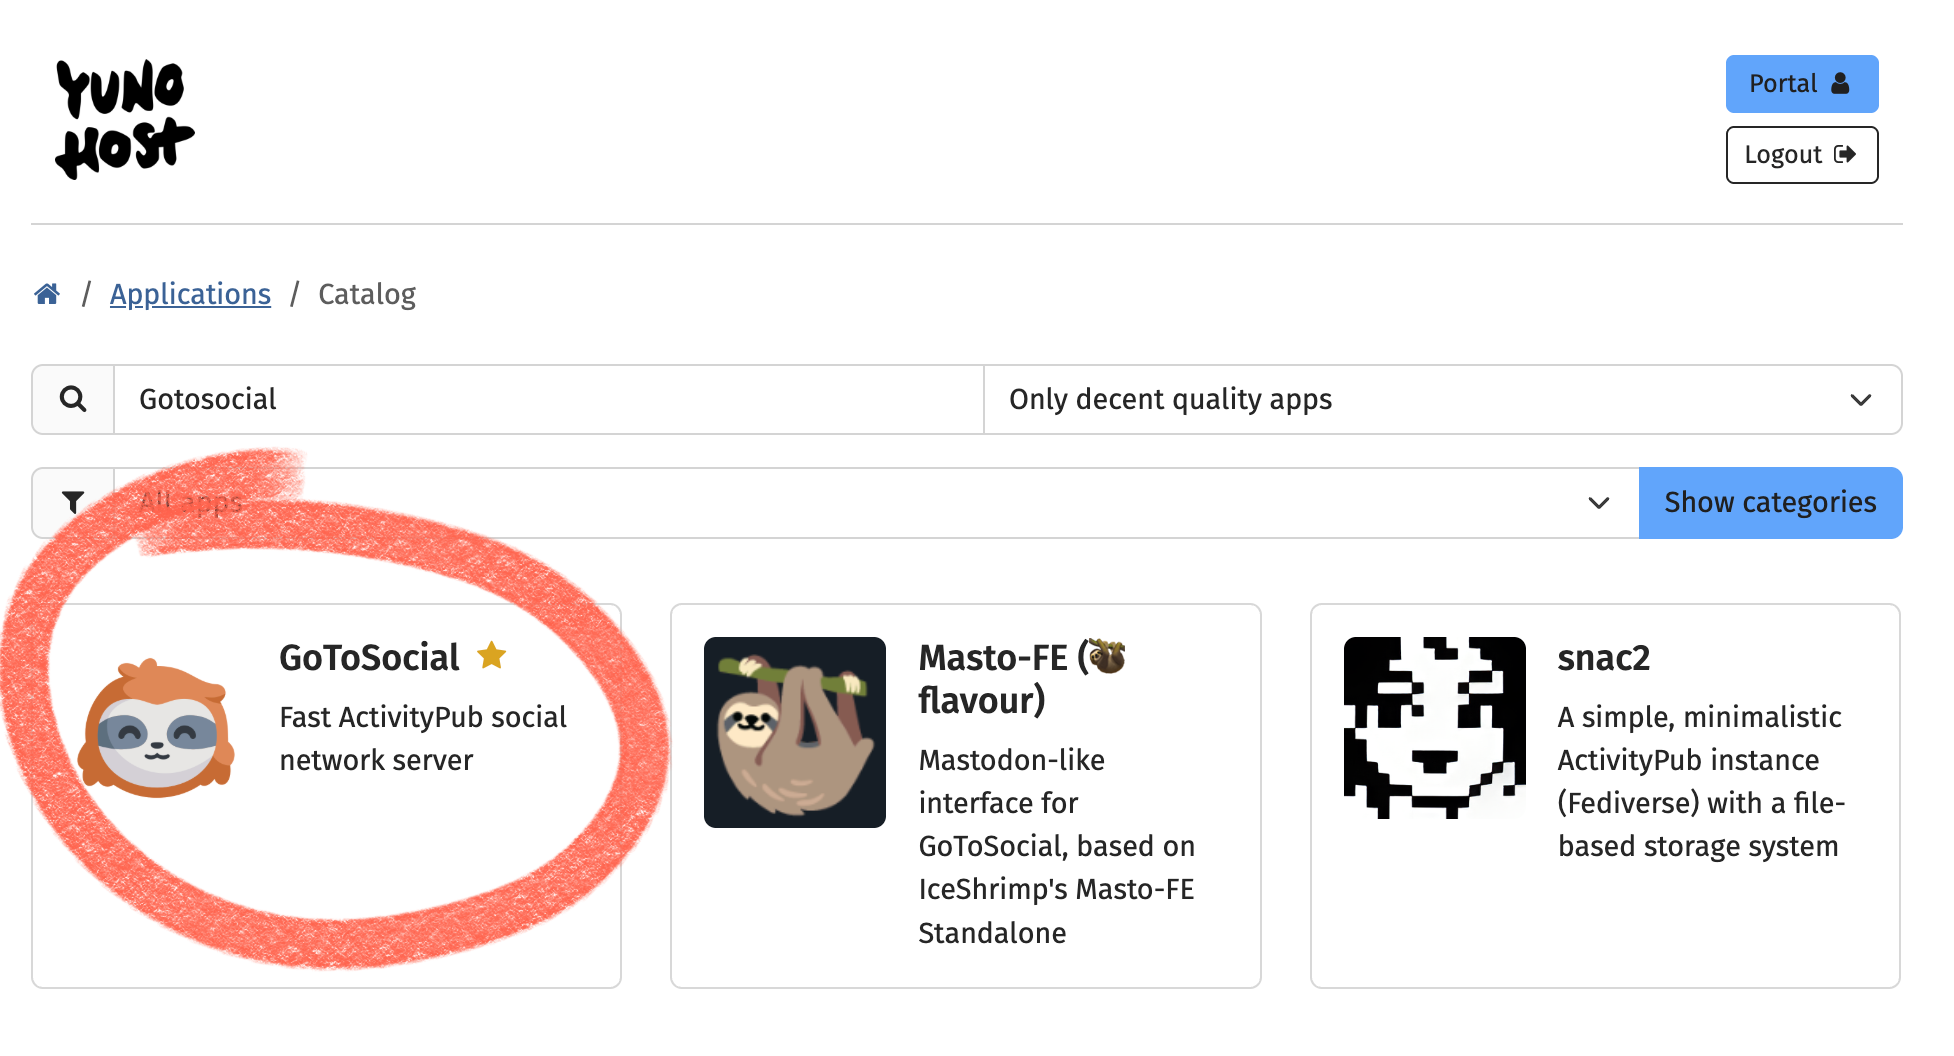
You will be directed to the GoToSocial installation page on YunoHost.
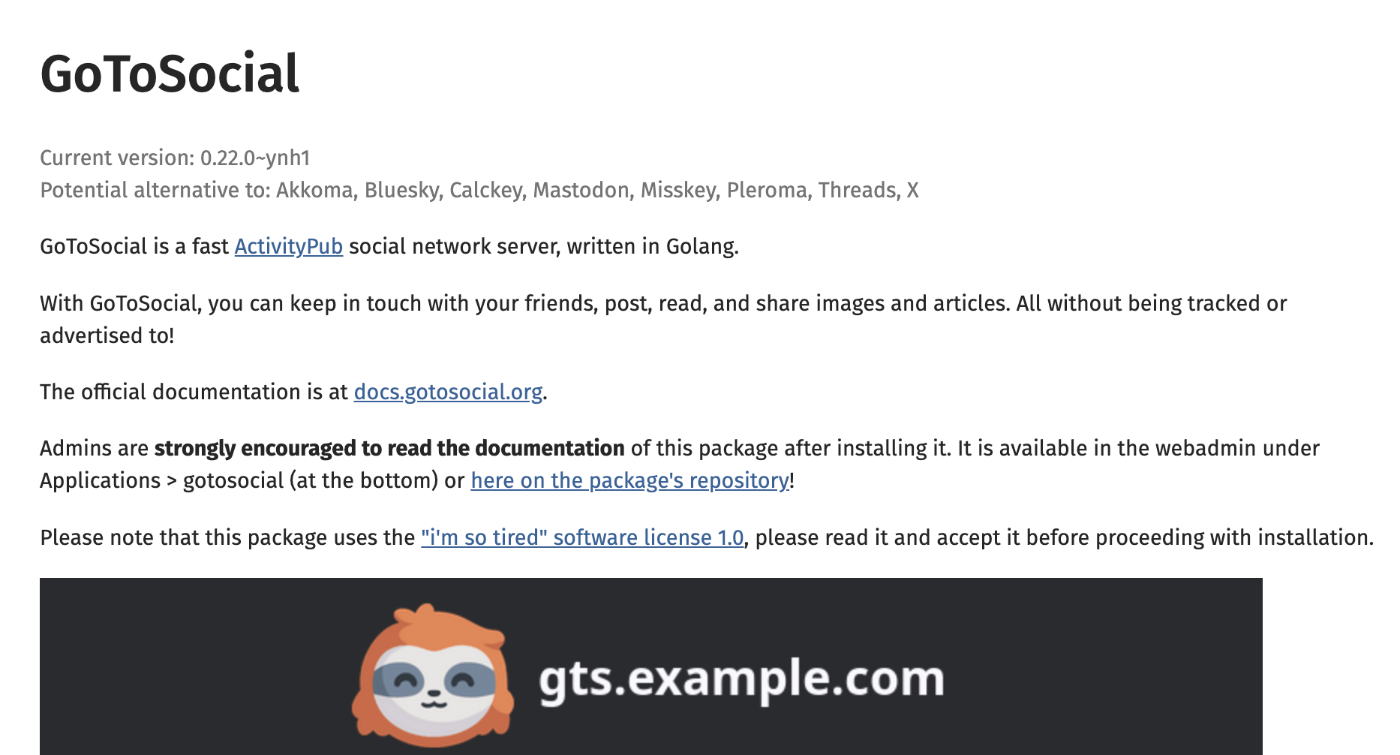
This page contains some really important information about GoToSocial that should be carefully read and considered, namely:
GoToSocial require a dedicated domain (or subdomain) name, for example: gotosocial.example.com
Also:
You will no longer be able to change this domain name once it has been set up GoToSocial.
And most important:
If you uninstall GoToSocial, you will no longer be able to use this domain name with another federated software installation, as it will be impossible to reuse the keys used to secure the federation.
In a fediverse post explaining this issue, patpro (@patpro@social.patpro.net) wrote:
I recommend you use a subdomain (ex. social.yourdomain.tld) for you GTS instance. If later you decide you want to try Snac, use a new subdomain (ex. snac.yourdomain.tld). If later you decide snac is better, use Activity Pub account migration feature to migrate your account (followers, etc.) from social.yourdomain.tld to snac.yourdomain.tld. This is how it is supposed to work on the fediverse. :) Then a month or so later, you can delete GTS and reclaim social.yourdomain.tld for another usage.
Another additional consideration on the technical side of things, from YunoHost's installation page:
⚠️ [GoToSocial] doesn’t work well on other than amd64 and arm64 systems, mainly due to performance of media decoding. This package will install the nowasm version on those systems; but please note that it is are experimental and unsupported, so please don't ask for support if your system uses it. (More info here.)[https://docs.gotosocial.org/en/latest/advanced/builds/nowasm/]The page also gives a heads-up to users that "GoToSocial does not provide a user interface." Now, this isn't really an issue because there are PLENTY of web clients that one could use with their own GoToSocial installation; my favorites are elk.zone, masto-fe and Phanpy (and I typically cycle between the three, depending on my mood). Because GoToSocial is compatible with the Mastodon API, you can use any Mastodon mobile apps: I personally use Tapbots' Ivory on my iPhone and Moshidon on my GrapheneOS phone. But we're getting ahead of ourselves here. It definitely takes longer to read all these instructions than to actually install GoToSocial.
Now, take care of installation settings by providing:
- the (sub)domain you want to use
- the admin username
- and finally the email address and password for your admin account:
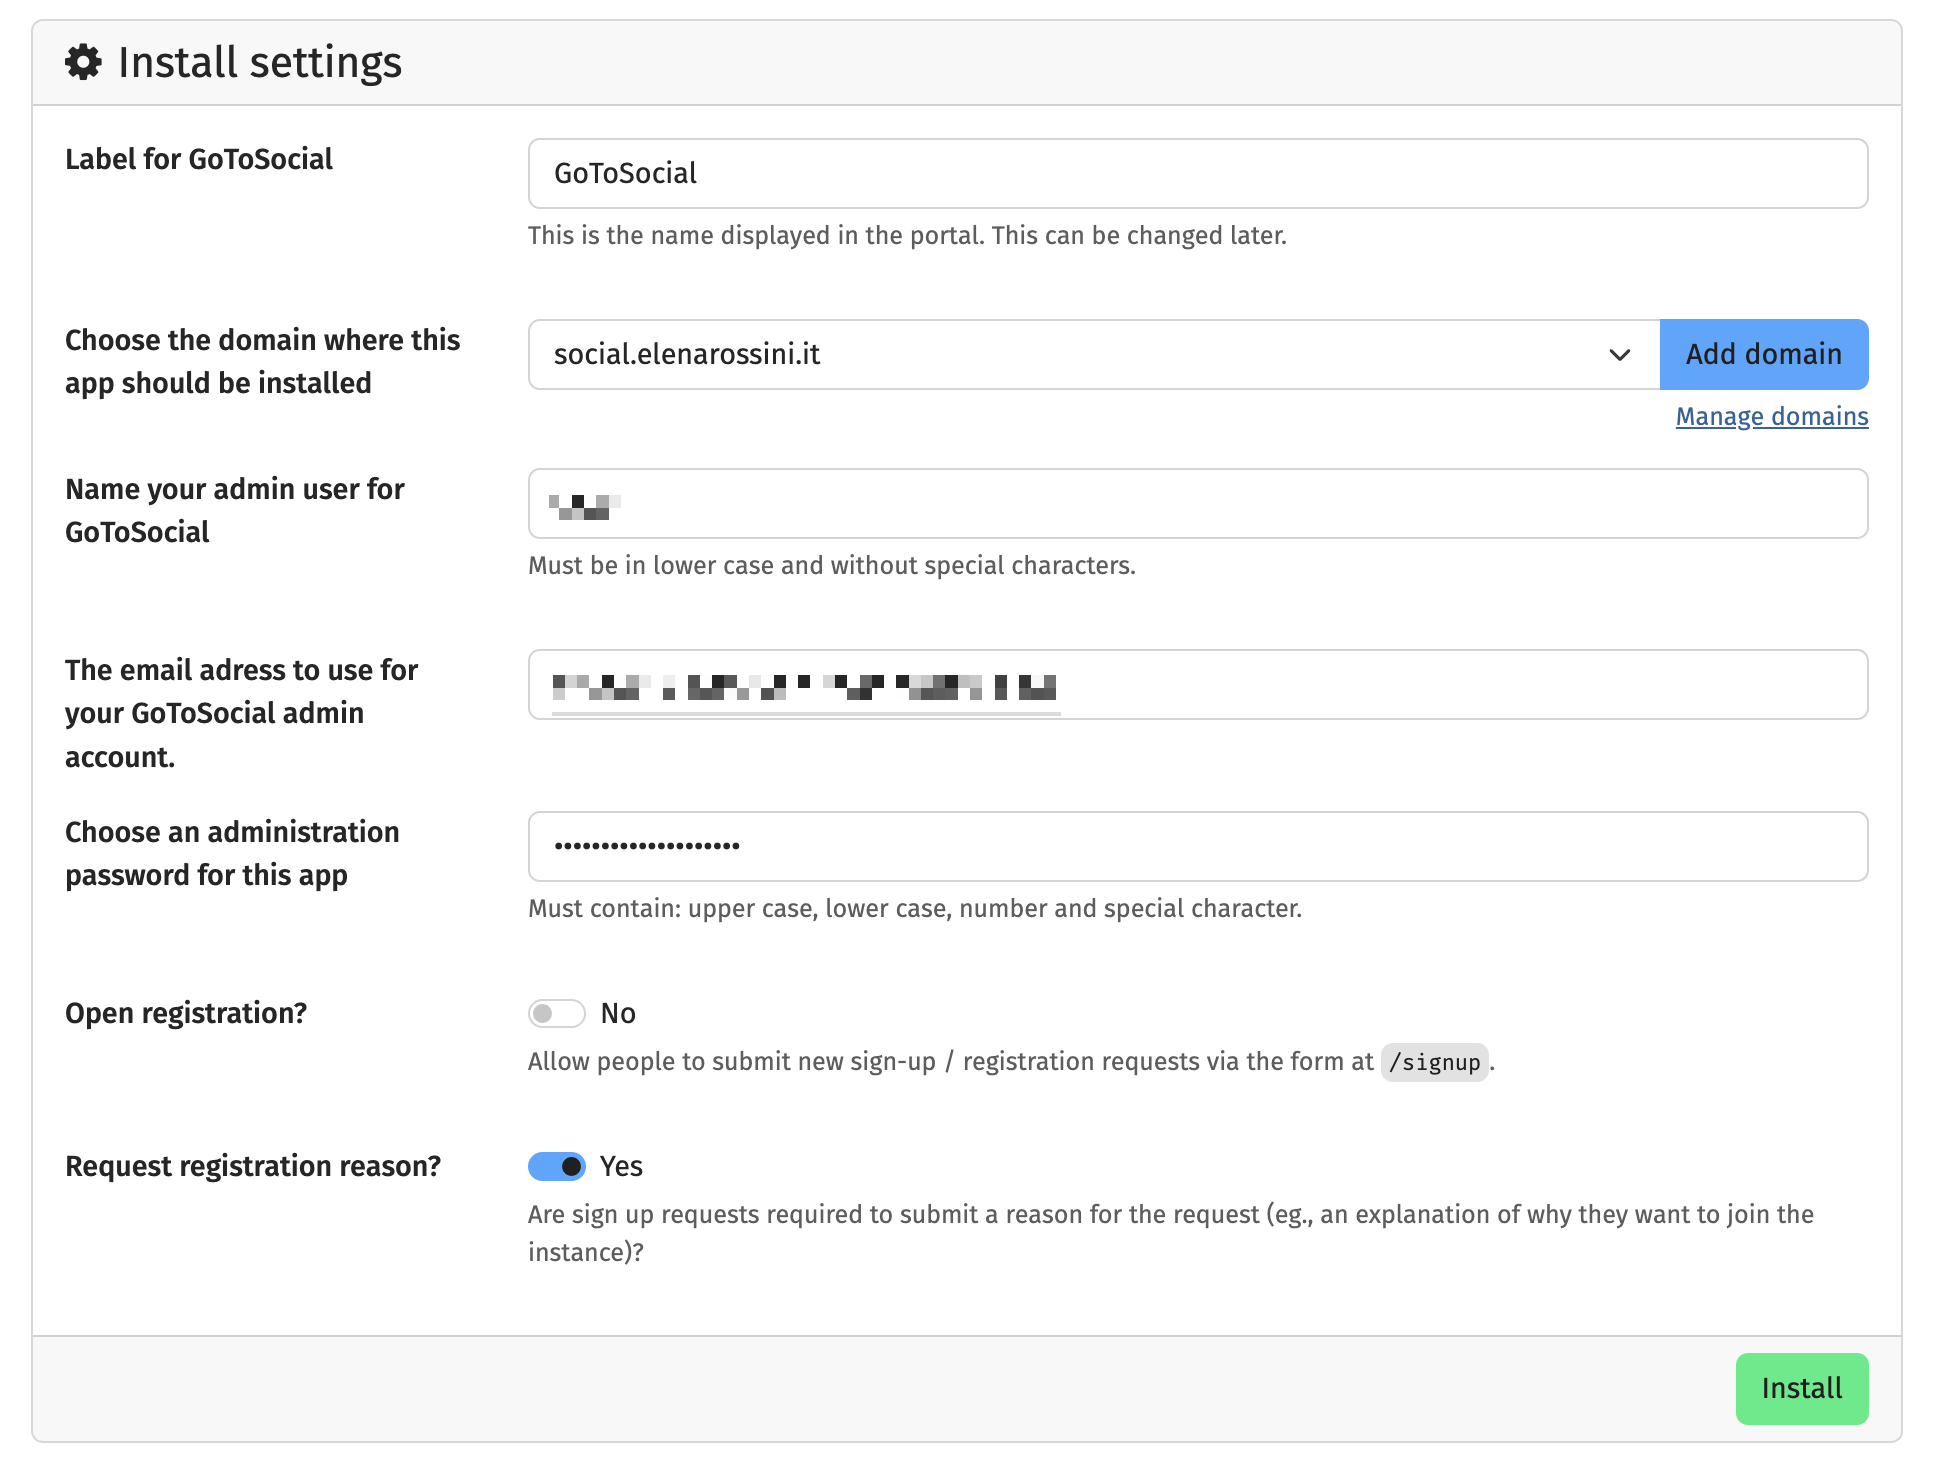
⚠️ Important! Make sure that "open registration" is set to "No" (this is the default setting anyway).
Then click on "Install" and wait for YunoHost to do its magic.
I used a stopwatch and the installation took exactly 1 minute and 15 seconds! (but once in the past it took well over 5 minutes, so do not despair if it's taking longer than expected - go make yourself a tea or a coffee and let it do its thing).
After GoToSocial has been successfully installed, you should receive a confirmation message:
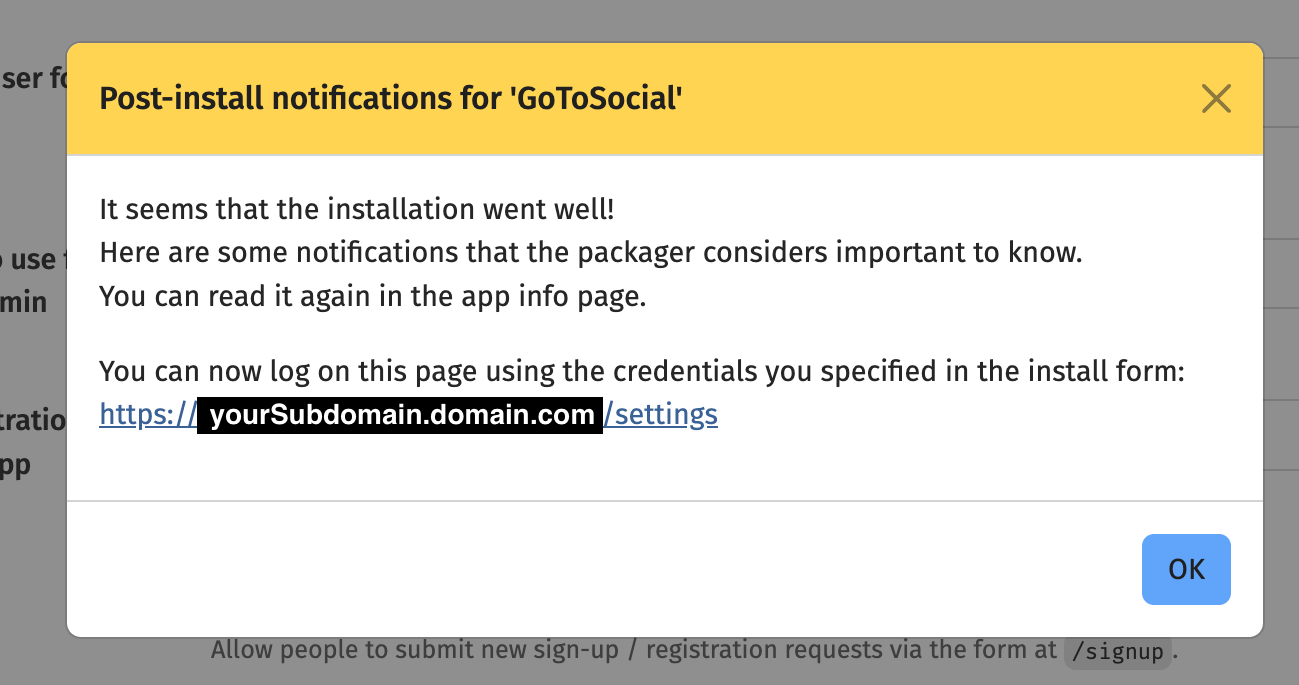
Step 3: Let's log into the GoToSocial admin dashboard
⏳ Estimated time: 1 minute
In your web browser, open a new window or tab and type:
yoursubdomain.domain.extension/settings
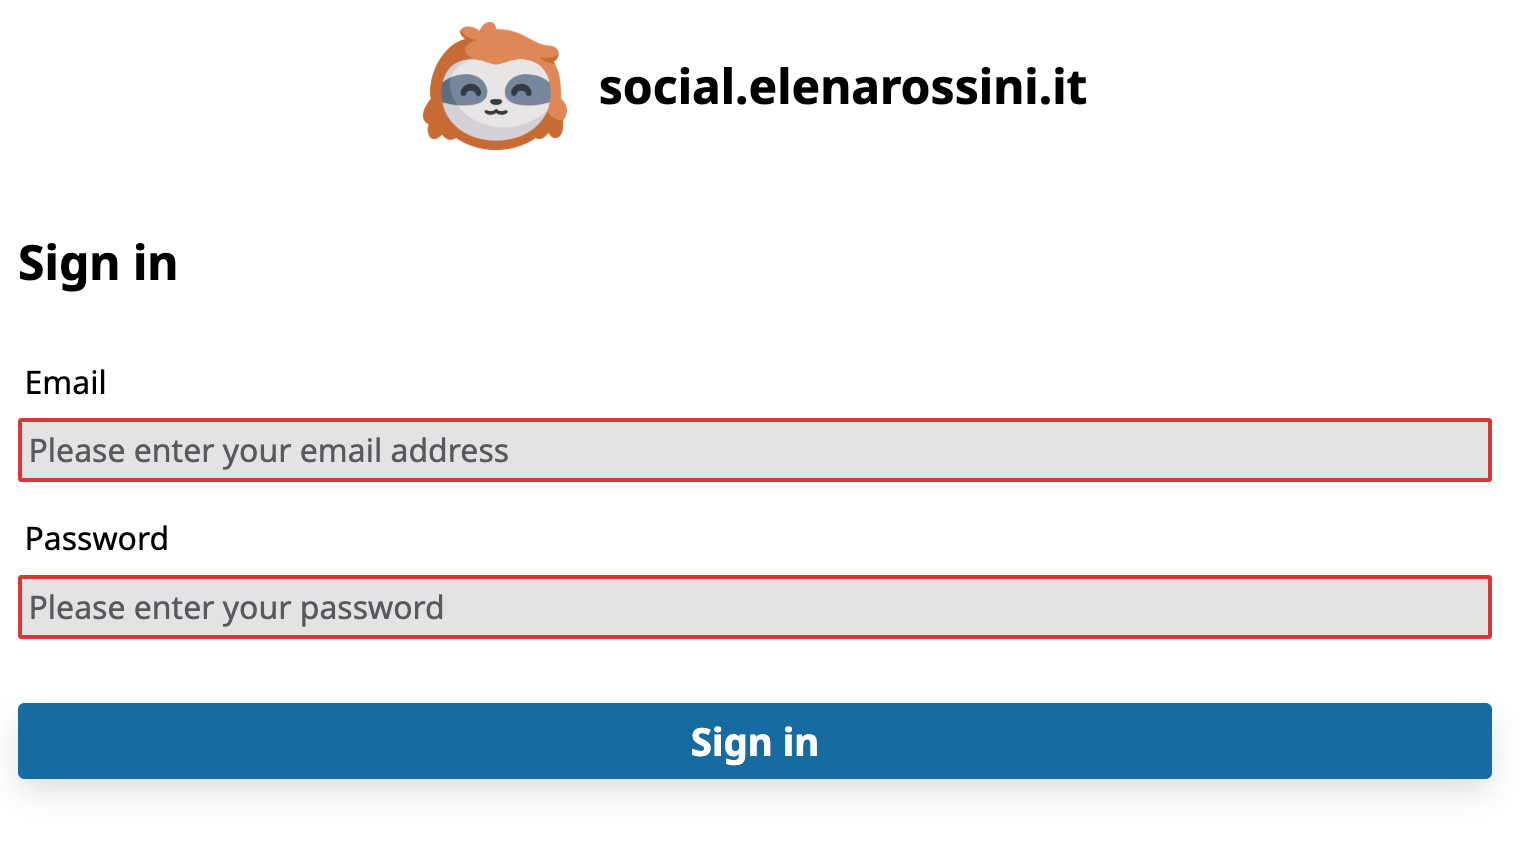
You'll be asked to sign in using the email address and password you created in the previous step, just before you clicked on "Install."
Fill out these fields and the click on "Sign in."
Step 4: let's beef up security
⏳ Estimated time: 10 minutes
Before you do any customizations to your brand new GoToSocial instance, I recommend you check or enable three things that will make your account more secure:
- double-check that registration for your instance is turned off
- set up two factor authentication
- upload some essential block lists to ward away known abusers
The first thing to check is that you have external registrations turned off for your instance. Thankfully, registrations are off by default, but I'm a strong believer in the saying "better safe than sorry" - so let's verify that.
From your YunoHost dashboard go to Applications » GoToSocial » Config Panel and make sure that "Open Registrations?" is set to "False":
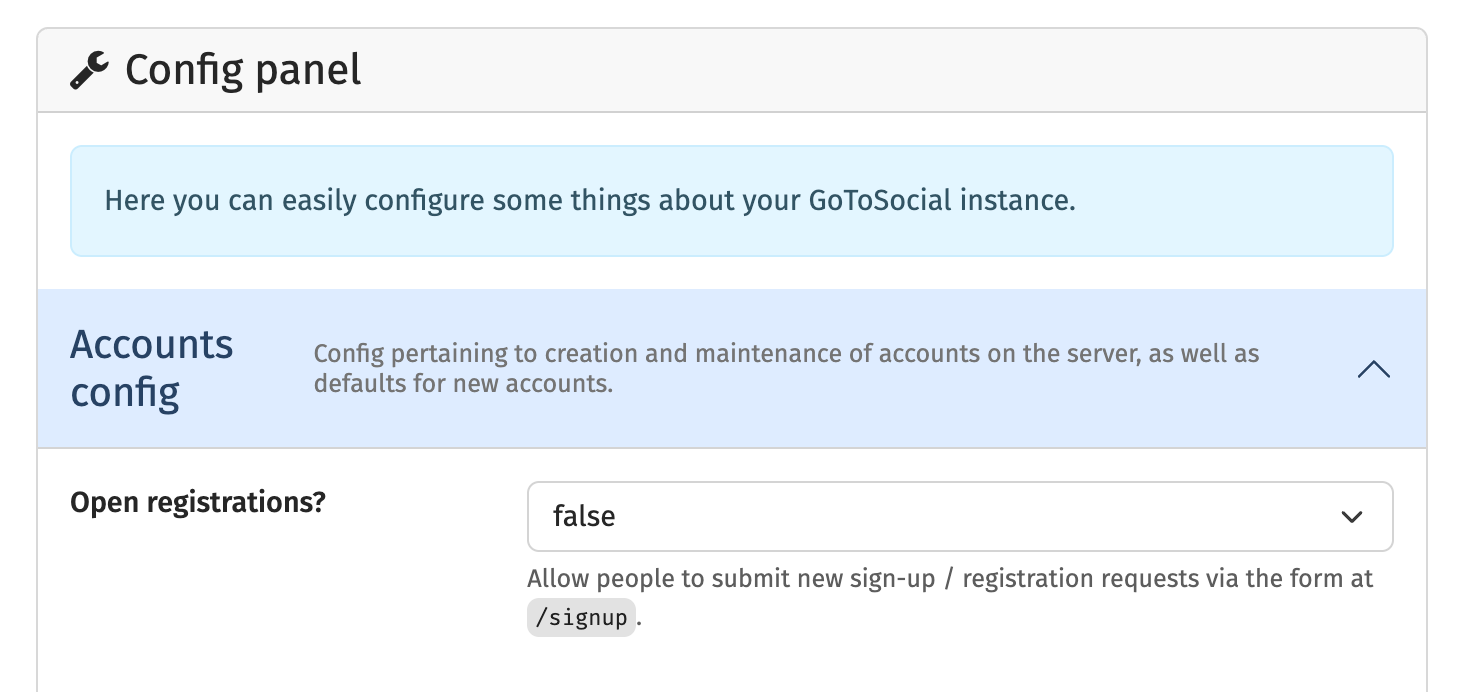
And then, just for peace of mind, try accessing the page yourGoToSocialURL/signup
You should see a message like this:
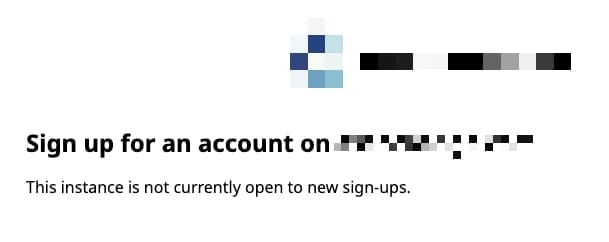
According to GoToSocial's dev Tobi, it is impossible for someone to create an account on your instance without your permission... but still, I like to make sure that the setting "open registrations" is turned off.
Moving on: let's set up two-factor authentication to log in.
Log into your GoToSocial instance (yourURL/admin) and click on "Account":
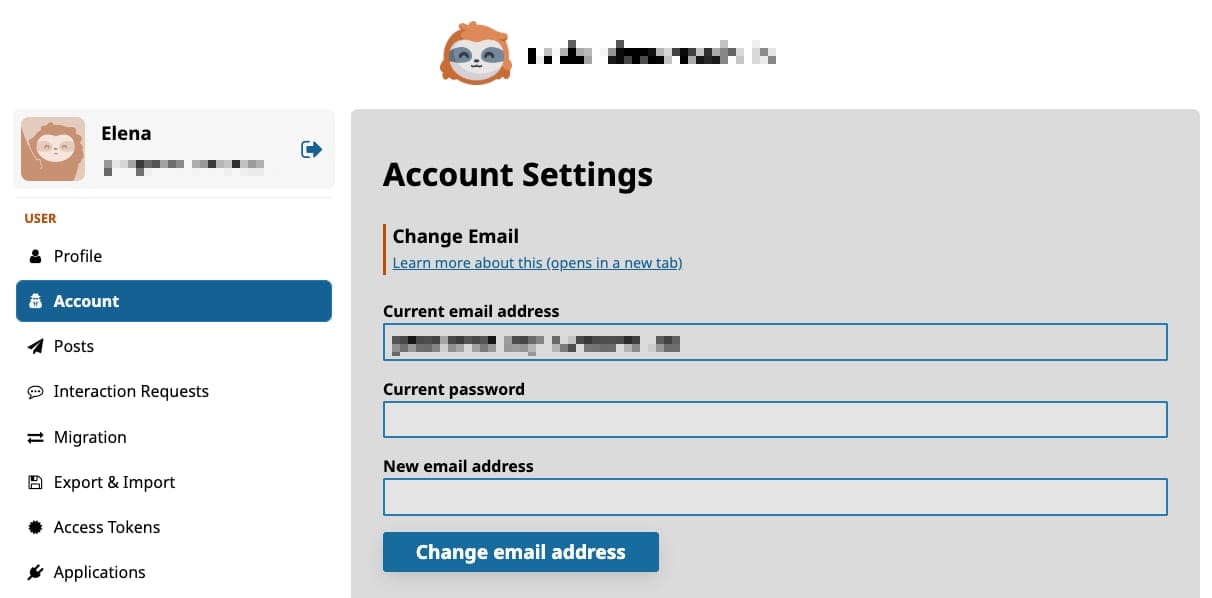
Now scroll all the way to the bottom of the page to reach the Two Factor Authentication (2FA) settings:
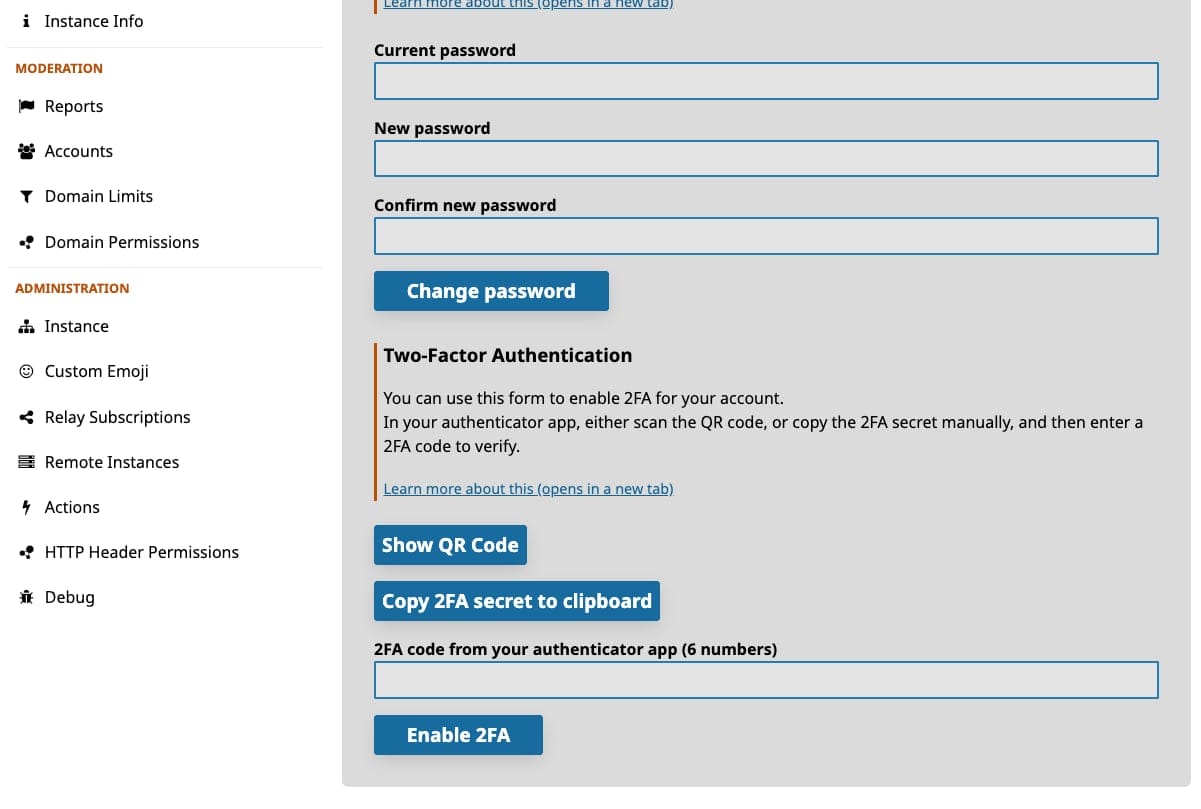
I use a password manager to store my 2FA codes.
So with that in mind, I open my password manager, go to the record for the login information of my brand new GoToSocial instance and click on "add one-time code".
I am now asked to scan a QR code, so I click on "Show QR Code" from my GoToSocial accounts page. After the code is successfully scanned, it generates a 6-digit number. I enter it in the blank field "2FA code from your authenticator app" and then click on "Enable 2FA."
I get an immediate confirmation message that two-factor authentication is now enabled on my account. I am also asked to save 8 recovery codes (in case the authenticator somehow fails or I lose access to it).
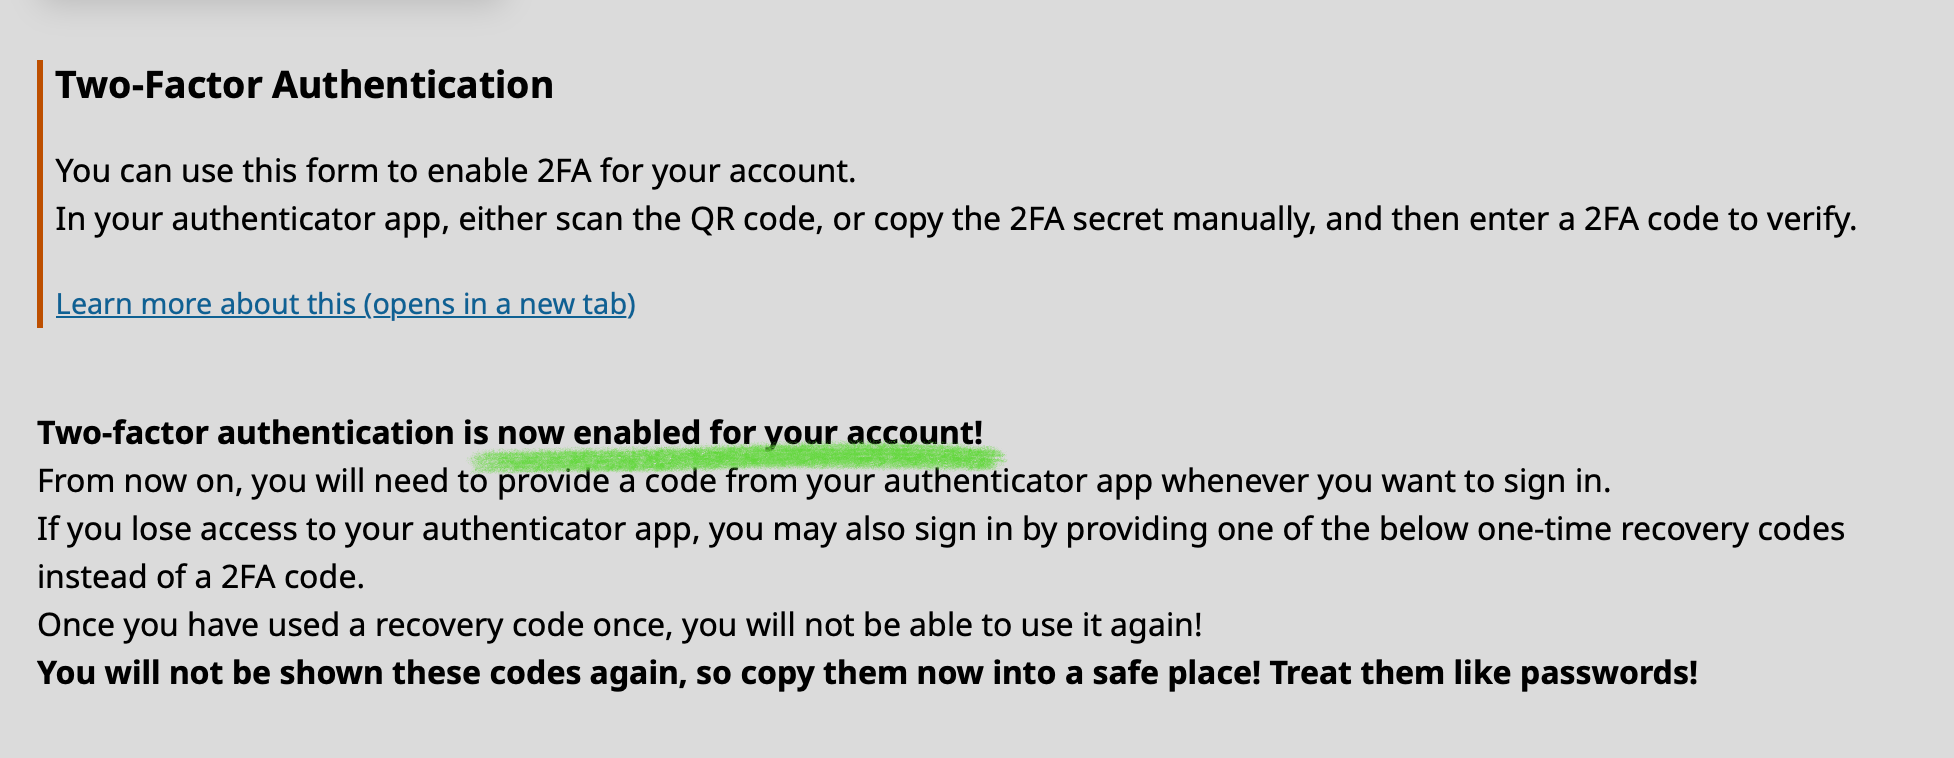
And lastly - but most important: block lists!
I would strongly advise you to upload to your GoToSocial's instance an essential blocklist created by Seirdy that instantly blocks infamous toxic and abusive fediverse servers.
I learned the importance of this the hard way - my main GoToSocial account shows in its bio my values: symbols of black lives matter, feminism, being against Nazis and support for LGBTQIA+ communities with the rainbow pride flag and the transgender pride flag. A couple of extremely toxic fediverse servers found my profile (after my Fediverse introduction video went viral) and decided to target me because of my values. I was able to immediately stop the abuse by uploading Seirdy's block list to my GoToSocial dashboard - and haven't encountered any problems ever since (in 13 months!)
The tier0.csv blocklist by Seirdy is the best resource to get started. I recommend you download it from their site:
 Seirdy
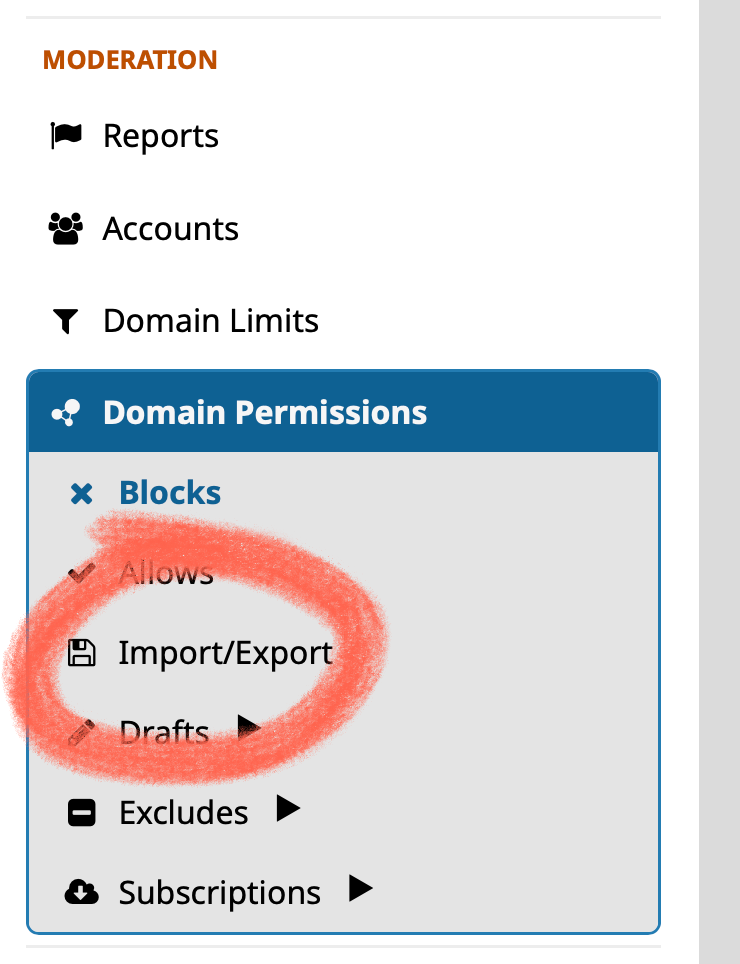
And then in order to upload it to your GoToSocial instance, you go to your dashboard, find "Moderation" in the sidebar and click on "Import/Export":
The open Seirdy's tier0.csv file, select the entire first column (with a long list of domain names, sorted alphabetically), copy it and paste it into the field on the "import/export" GoToSocial page:
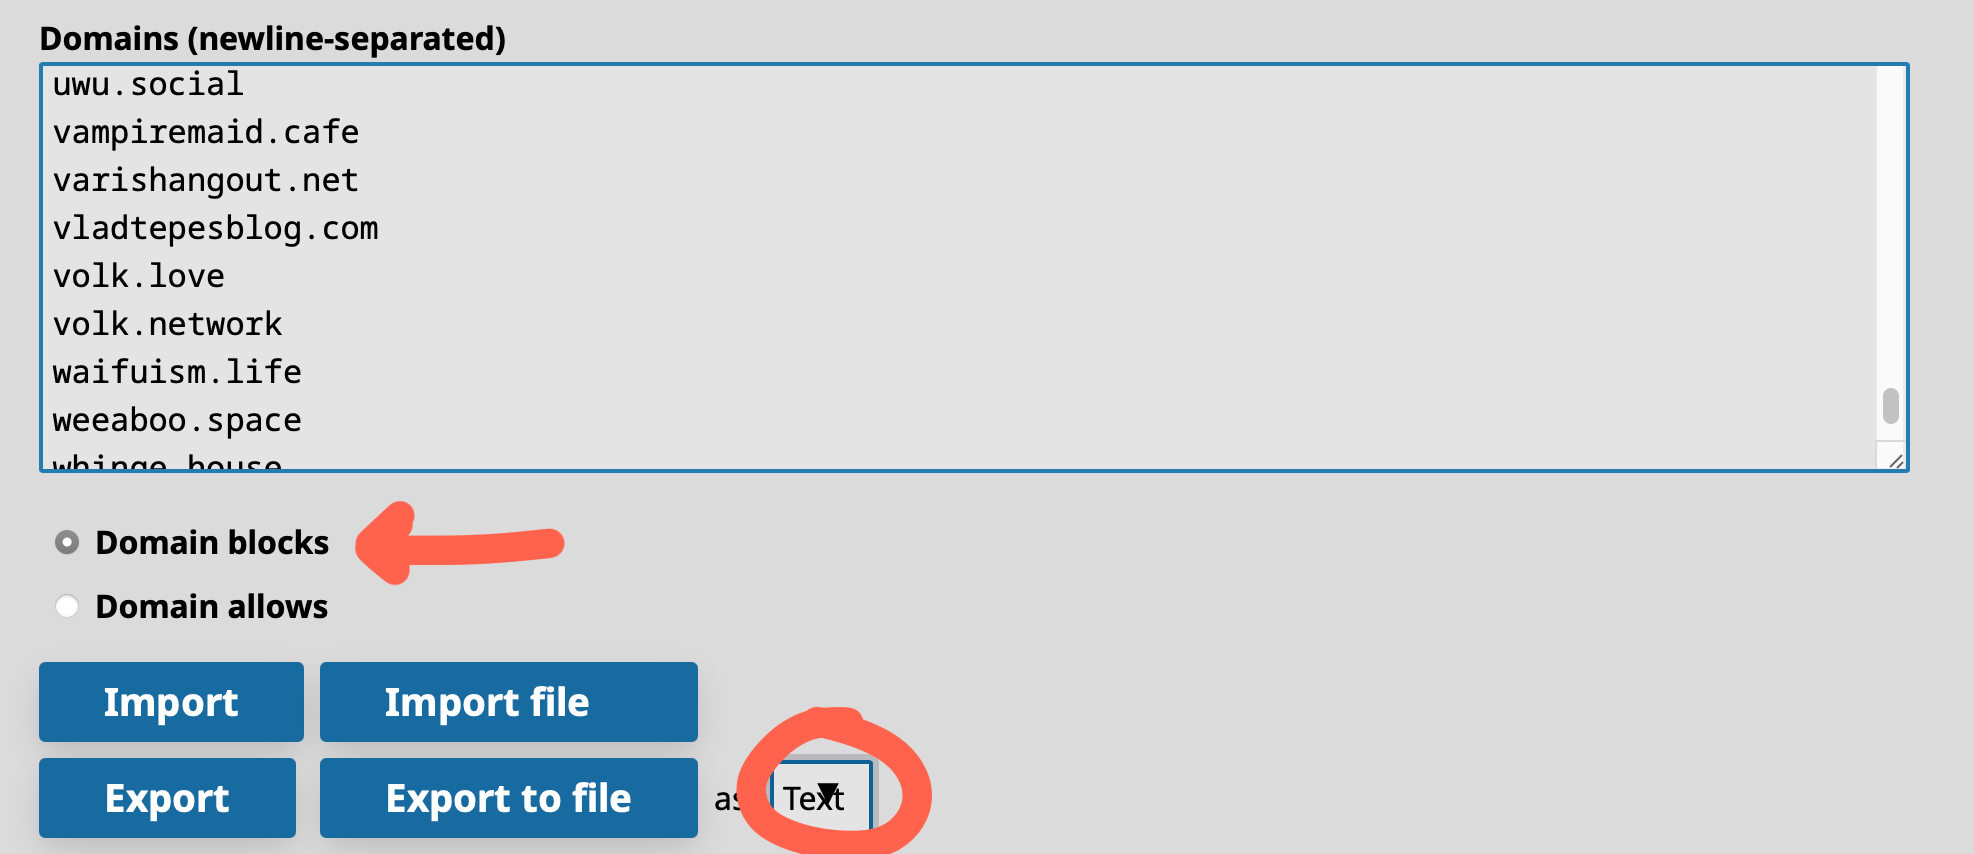
Now make sure you have "domain blocks" selected... and next to the button "export to file" there is "as" and a pulldown menu. Verify that "text" is selected in the pulldown menu. Then click on "Import".
You will be asked to manually review and confirm you want to block these domains. Go ahead with the confirmation.
Now when you click on "Blocks" in the sidebar, you should see something like this:
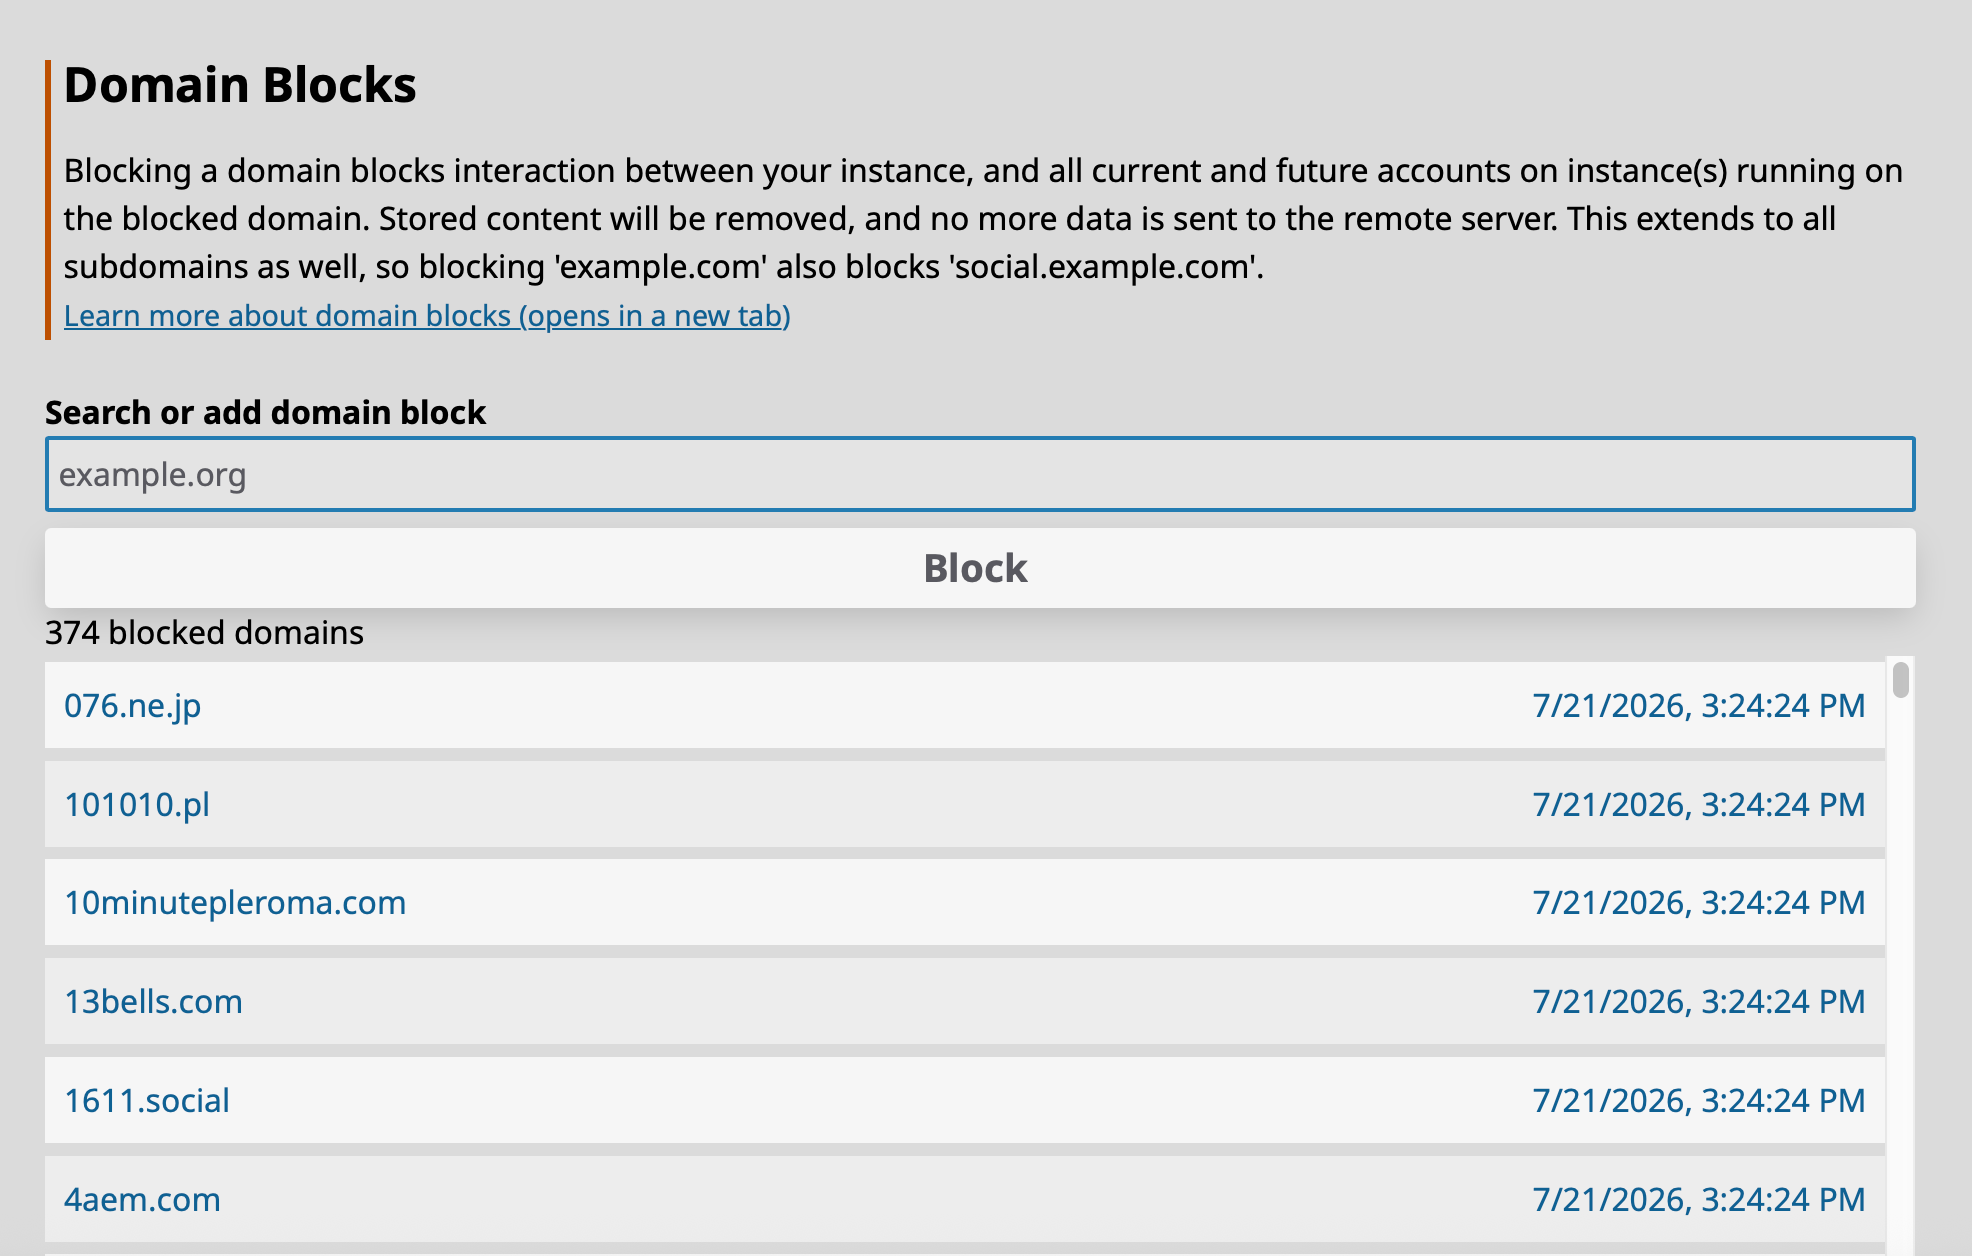
That's it! You've now secured your brand new GoToSocial instance.
Reviewing this blog post I realize that it covers a lot of information. Reading time is 13 minutes, while completing all the steps should take about 25 minutes. I recommend you maybe print this out and give yourself an hour to set up in all tranquillity your own, self-hosted GoToSocial account. It's a really empowering feeling.
In the next chapter I will discuss how to personalize it and send your first message.
Thanks for being here,
Elena
P.S.: GoToSocial has an Open Collective page for donations to support the hard work of its developers Tobi and Kim. If you can afford it, please contribute here:



💓 Did you enjoy this post? Share it with a friend!
👫 Follow me on Mastodon. All my other links are available here: elena.social
📽️ If you'd like to support my work, you could buy or rent my documentary The Illusionists on the globalization of beauty:

The Illusionists
THE ILLUSIONISTS is an award-winning documentary about the globalization of beauty and the dark side of advertising.
💌 If you'd like to say hi, my contact information is here
✏️ If this post resonated with you, leave a comment!